


Tulips are one of the most popular spring flowers, admired for their bright colors, elegant shapes, and ability to transform any garden into a vibrant oasis. Whether you’re a beginner gardener or an experienced plant lover, knowing how to plant tulips correctly is key to enjoying healthy, long-lasting blooms.
In this guide, we’ll walk you through 6 easy steps—from selecting the right bulbs and preparing the soil to planting, watering, and ongoing care. By following these simple steps, you can create a stunning spring garden filled with colorful tulips that return year after year.
Table of Contents
Why Plant Tulips?
Planting tulips is a simple way to add color and charm to your garden. Understanding how to plant tulips correctly helps ensure healthy, vibrant blooms year after year. Here are the main reasons to include tulips in your garden:
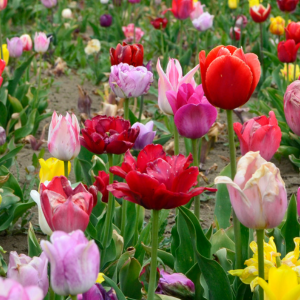
- Vibrant Colors: Tulips come in a wide range of colors, from soft pastels to bold reds and purples, instantly brightening any garden space.
- Hardy and Low-Maintenance: Once planted, tulips require minimal care, making them ideal for both beginners and experienced gardeners.
- Reliable Spring Blooms: Planting tulip bulbs in the fall allows them to establish strong roots, ensuring beautiful blooms when spring arrives.
- Versatile Gardening Options: Tulips can be planted in flower beds, borders, rock gardens, or even in pots and containers.
- Symbolic Beauty: Tulips represent renewal, hope, and joy, adding not just color but meaning to your garden.
- Yearly Return: With proper care, tulips can bloom year after year, making them a long-lasting addition to your outdoor space.
By following the right steps for how to plant tulips, you can enjoy a stunning and colorful spring garden with minimal effort.
Choosing the Right Tulip Bulbs
Selecting the right bulbs is the first and most important step in how to plant tulips. High-quality tulip bulbs set the foundation for healthy, vibrant blooms in spring. Here’s what to consider:
- Firmness: Choose bulbs that feel solid and firm to the touch. Soft or spongy bulbs may be damaged or beginning to rot.
- Size Matters: Larger bulbs generally produce bigger, stronger flowers. Opt for plump bulbs for a more impressive bloom.
- Free from Mold or Damage: Inspect bulbs carefully and avoid any with mold, cracks, or discoloration. Healthy bulbs are crucial for successful growth.
- Variety Selection: Pick a tulip variety suited to your climate and desired bloom time. Early, mid, and late-blooming types ensure a longer flowering season.
By starting with healthy, well-chosen bulbs, you give your tulips the best chance to thrive and create a colorful, long-lasting display in your garden.
Best Time to Plant Tulip Bulbs

Knowing the right time to plant is essential in how to plant tulips. Fall is generally the best season, but there are several factors to consider:
- Ideal Window: Plant tulip bulbs 6–8 weeks before the first hard frost in your area. This gives bulbs enough time to establish strong roots before winter.
- Avoid Early Planting: Planting too early may cause bulbs to sprout before winter, making them susceptible to frost damage.
- Avoid Late Planting: Planting too late may prevent roots from developing fully, leading to weaker or delayed blooms.
- Cold Requirement: Tulip bulbs need a period of cold dormancy to bloom properly. Fall planting allows them to experience natural cold, triggering healthy growth in spring.
- Warm Climate Tip: In warmer regions, pre-chill bulbs in the refrigerator for 6–8 weeks before planting to mimic winter conditions.
- Long-Term Benefit: Proper timing helps bulbs adapt to their environment, resist disease, and produce vibrant, consistent flowers year after year.
By following these guidelines, you ensure your tulips have the best chance to thrive, making this step a critical part of how to plant tulips successfully.
Common Mistakes to Avoid When Planting Tulips
Even experienced gardeners can make mistakes when learning how to plant tulips. Avoiding these common errors ensures your tulips grow healthy and bloom beautifully each spring:
- Planting Too Shallow or Too Deep: Bulbs planted too shallow may be exposed to frost, while bulbs planted too deep may struggle to sprout. Stick to the recommended depth of 6–8 inches.
- Using Poor-Quality Bulbs: Soft, moldy, or damaged bulbs are unlikely to grow properly. Always select firm, healthy bulbs for best results.
- Ignoring Soil Drainage: Tulips need well-drained soil. Planting in soggy or heavy clay soil can cause bulbs to rot. Improve drainage with compost, sand, or raised beds.
- Overcrowding Bulbs: Planting bulbs too close together can limit growth and reduce airflow, increasing the risk of disease. Maintain 4–6 inches of spacing between bulbs.
- Neglecting Sunlight Needs: Tulips require full sun to thrive. Planting in shaded areas may result in weak stems and fewer blooms.
- Watering Mistakes: Overwatering can cause bulb rot, while under-watering can prevent proper root establishment. Water bulbs carefully after planting and only when the soil is dry.
- Cutting Leaves Too Early: Removing leaves before they naturally yellow prevents the bulb from storing energy for the next season, leading to weaker blooms the following year.
By avoiding these common mistakes, you give your tulips the best chance to thrive, making your garden vibrant and full of color each spring.
6 Easy Steps on How to Plant Tulips
Tulips are one of the most beloved spring flowers, known for their vibrant colors and elegant shapes. Whether you’re a beginner gardener or an experienced plant lover, knowing how to plant tulips correctly is key to enjoying healthy, long-lasting blooms. In this guide, we’ll walk you through 6 easy steps—from choosing the right bulbs to caring for them after planting—so you can create a stunning spring garden filled with colorful tulips.
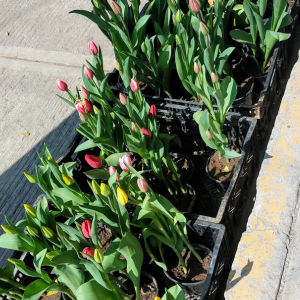
1. Choose Healthy Tulip Bulbs
The first and arguably most crucial step in how to plant tulips is selecting the healthiest bulbs possible. The quality of the bulb directly determines the strength, size, and longevity of your tulip blooms. Taking the time to choose the right bulbs ensures that your garden will thrive year after year.
- Check for Firmness: A healthy tulip bulb should feel firm and solid when gently squeezed. Soft, spongy, or shriveled bulbs are signs of age, damage, or disease and are unlikely to produce strong flowers. Always avoid bulbs that feel mushy or brittle.
- Select Larger Bulbs for Bigger Blooms: Generally, the size of the bulb correlates with the size of the flower it will produce. Larger bulbs contain more stored nutrients, resulting in stronger stems and fuller, more vibrant blooms. If your goal is a dramatic spring display, opt for the largest, plumpest bulbs you can find.
- Inspect for Mold and Disease: Carefully examine each bulb for mold, discoloration, or soft spots. Moldy or damaged bulbs may rot quickly after planting and can affect nearby healthy bulbs. Healthy tulip bulbs should have a dry, clean outer coating with no signs of fungal growth.
- Examine the Bulb’s Outer Layers: The outer papery layer protects the bulb during storage and planting. Look for bulbs with intact, unbroken skin. Peeling or torn outer layers may expose the bulb to pests or disease.
- Consider the Variety and Blooming Time: Tulips come in early, mid, and late-blooming varieties. Choosing bulbs suited for your climate and desired bloom schedule ensures a prolonged and balanced display. For example, early bloomers are ideal for brightening up late winter gardens, while late bloomers extend the flowering season into mid-spring.
- Source from Reputable Suppliers: Always buy tulip bulbs from trusted nurseries or garden centers. Quality suppliers often pre-sort bulbs for size, health, and disease resistance, giving you the best chance for successful growth.
By investing in high-quality, healthy bulbs, you set a strong foundation for your garden. This step is essential in how to plant tulips, because even perfect planting techniques won’t compensate for weak or damaged bulbs. Taking the time to select robust, disease-free bulbs maximizes your chances of a stunning and long-lasting spring bloom.
2. Pick the Right Location
Once you’ve selected healthy tulip bulbs, the next essential step in how to plant tulips is choosing the right location. The success of your tulip blooms depends heavily on sunlight, soil quality, and drainage. Planting in an unsuitable spot can lead to weak flowers or bulbs that fail to grow.
- Full Sunlight is Ideal: Tulips thrive in areas that receive at least 6 hours of direct sunlight each day. While they can tolerate partial shade, insufficient sunlight may result in smaller blooms and weaker stems. Sunlight also helps the flowers develop vibrant colors.
- Well-Drained Soil: Tulips are prone to bulb rot if planted in soggy or poorly drained soil. Avoid low-lying areas where water tends to collect after rainfall. If your garden has heavy clay soil, consider adding sand, compost, or organic matter to improve drainage.
- Soil Fertility: While tulips are not overly demanding, planting in fertile soil ensures strong root development and healthy blooms. Loosen the soil and mix in compost or well-rotted organic matter to give the bulbs a nutrient-rich environment.
- Avoid Crowded Areas: Ensure the location provides enough space for tulip bulbs to grow without competition from large shrubs, trees, or other plants. Overcrowding can reduce air circulation, increase disease risk, and limit flowering.
- Protection from Strong Winds: Tall tulips can be prone to bending or breaking in windy areas. Plant them near fences, walls, or shrubs that provide some natural protection while still allowing sunlight.
- Consider Aesthetic Placement: Tulips look best when planted in clusters or drifts rather than single lines. Think about how the blooms will appear in spring and plan for grouping bulbs of complementary colors for maximum visual impact.
Choosing the right location is a critical part of how to plant tulips. A sunny, well-drained, and protected spot ensures strong root growth, healthy stems, and vibrant blooms that will enhance your garden year after year.
3. Prepare the Soil
Preparing the soil properly is a key step in how to plant tulips. Healthy, well-prepared soil provides the nutrients, drainage, and structure that tulip bulbs need to grow strong roots and produce vibrant blooms. Follow these steps for the best results:

- Loosen the Soil: Use a garden fork or spade to loosen the soil to a depth of about 12 inches. This allows the tulip bulbs to establish roots easily and encourages better drainage. Compact soil can prevent proper root growth and lead to poor flowering.
- Improve Drainage: Tulips do not tolerate waterlogged soil. If your garden has heavy clay soil or tends to hold water, mix in sand or fine gravel to improve drainage. Raised beds are another great option for areas with poor drainage.
- Add Organic Matter: Mix in compost, well-rotted manure, or organic garden soil. This enriches the soil with nutrients, improves texture, and helps retain the right amount of moisture for bulbs.
- Check Soil pH: Tulips prefer slightly acidic to neutral soil, with a pH between 6.0 and 7.0. You can test your soil with a kit and adjust it if necessary using lime to raise pH or sulfur to lower it.
- Remove Debris and Weeds: Clear away rocks, sticks, and weeds from the planting area. This prevents competition for nutrients and water and reduces the risk of disease.
- Optional Fertilizer: Before planting, you can lightly mix in a slow-release, balanced fertilizer. This gives the bulbs an initial nutrient boost to help them establish roots and grow stronger in spring.
Proper soil preparation is essential in how to plant tulips. By loosening the soil, improving drainage, adding nutrients, and clearing debris, you create the perfect environment for your bulbs to thrive and produce healthy, colorful blooms.
4. Planting Depth and Spacing
Once your soil is ready, the next step in how to plant tulips is planting the bulbs at the correct depth and spacing. Proper planting ensures strong root development, healthy growth, and abundant blooms.
- Planting Depth: Tulip bulbs should be planted about 6–8 inches deep, measured from the base of the bulb to the soil surface. Planting too shallow can expose bulbs to frost or drying out, while planting too deep may delay flowering.
- Orientation: Always place the bulb with the pointed end facing upward. The roots grow from the flat base, while the shoot emerges from the tip. Planting bulbs upside down can prevent proper growth.
- Spacing Between Bulbs: Space tulip bulbs 4–6 inches apart. Crowding bulbs can lead to competition for nutrients and water, which may result in smaller or weaker flowers. Adequate spacing also improves air circulation, reducing the risk of fungal diseases.
- Planting in Clusters: For a more striking visual effect, consider planting tulips in groups or clusters rather than a straight line. Grouping bulbs of similar or complementary colors creates a fuller, more natural-looking display in spring.
- Mark Your Planting Area: If you’re planting multiple varieties or colors, mark the spots or create a planting plan. This makes it easier to identify and maintain different types and ensures a balanced garden layout.
By paying attention to planting depth, orientation, and spacing, you give your tulips the best chance to thrive. Correct planting is a vital step in how to plant tulips, ensuring healthy growth and vibrant blooms that will delight your garden each spring.
5. Watering and Mulching
After planting your tulip bulbs, proper watering and mulching are crucial for healthy growth. These steps are an important part of how to plant tulips, as they help the bulbs establish roots, protect them from harsh weather, and prevent disease.
- Initial Watering: Water the bulbs thoroughly right after planting. This helps settle the soil around the bulbs and kickstarts root development. Make sure the soil is moist but not waterlogged.
- Avoid Overwatering: Tulips are prone to rot if their bulbs sit in soggy soil. Only water again if the soil is dry. Natural rainfall is often sufficient in most fall climates, so adjust supplemental watering accordingly.
- Mulching Benefits: Apply a 2–3 inch layer of mulch over the planting area. Organic mulch like shredded bark, straw, or leaves helps regulate soil temperature, retain moisture, and protect the bulbs from frost.
- Winter Protection: Mulch acts as an insulating layer during cold months, preventing the soil from freezing and thawing repeatedly, which can damage bulbs.
- Spring Care: As the weather warms in spring and tulips begin to emerge, gradually remove mulch so the shoots can access sunlight. Mulching also reduces weed growth, giving your tulips less competition for nutrients and water.
- Fertilizer Boost: While watering, you can also apply a balanced, slow-release fertilizer around the bulbs to encourage stronger stems and vibrant blooms.
Proper watering and mulching are essential in how to plant tulips. These simple steps protect your bulbs, help roots establish, and create the ideal conditions for healthy, colorful spring flowers.
6. Caring for Tulips After Planting
The final step in how to plant tulips involves ongoing care after planting to ensure your bulbs grow strong and produce vibrant blooms. Proper post-planting care helps tulips thrive year after year.
- Gradual Mulch Removal: In early spring, as tulip shoots begin to emerge, gradually remove the mulch to allow sunlight to reach the young plants. This prevents the shoots from becoming weak and promotes healthy growth.
- Watering During Growth: Water tulips moderately during the growing season, especially if rainfall is insufficient. Focus on keeping the soil slightly moist but never soggy, as overwatering can cause bulb rot.
- Fertilizing: Apply a balanced, slow-release fertilizer as soon as the shoots appear. Fertilizer provides essential nutrients for strong stems, larger flowers, and better overall plant health. Avoid over-fertilizing, which can burn the bulbs.
- Deadheading Blooms: Once tulips finish flowering, remove spent flowers to prevent the plant from using energy to produce seeds. However, leave the leaves intact. The foliage continues to photosynthesize, storing energy in the bulb for next year’s bloom.
- Allow Leaves to Die Naturally: Do not cut back leaves until they turn yellow and wither naturally. Premature removal can weaken the bulb and reduce bloom strength in the following spring.
- Protect from Pests: Watch for pests like squirrels, rodents, or deer, which may dig up bulbs or eat flowers. Consider fencing, repellents, or planting bulbs alongside pest-deterrent plants.
- Replanting if Needed: After a few years, some tulip varieties may decline in bloom quality. Dig up and divide crowded bulbs in late summer or fall to maintain strong flowering.
Caring for tulips after planting is a key part of how to plant tulips successfully. By following these steps—gradual mulch removal, proper watering, fertilizing, deadheading, and allowing leaves to die naturally—you ensure that your tulips remain healthy, vibrant, and ready to bloom beautifully each spring.
Conclusion
Tulips are a timeless favorite for spring gardens, bringing vibrant colors, elegance, and charm to any space. Knowing how to plant tulips correctly—from selecting healthy bulbs and choosing the right location to planting at the proper depth and caring for them after planting—ensures strong growth and stunning blooms year after year.
By following the six easy steps outlined in this guide, avoiding common mistakes, and providing proper care, you can enjoy a garden filled with beautiful tulips every spring. With a little planning and attention, your tulips will reward you with a colorful, long-lasting display that brightens your outdoor space and uplifts your home.
